How to Use GoBuster for OSINT
No matter whether you are an OSINT pro or an ethical hacker, GoBuster is a go-to tool for penetration testing of the system. Learn how to use this instrument in order to scan through a large volume of data and find and unveil hidden paths with this comprehensive guide from X-Ray Contact.
What Is GoBuster?
GoBuster is a well-known tool used for directory and file brute-forcing during penetration testing or OSINT gathering. Brute-forcing is a technique employed to discover hidden directories and files on web servers by systematically attempting to access different URLs. It works by trying various combinations of paths and filenames based on a specified wordlist. For each attempted request, GoBuster analyzes the HTTP response received from the server. Depending on the response status code it determines whether the accessed path is valid or not. Thus, it's one of the useful Kali Linux instruments utilized to reveal directories or paths on web servers that would not be apparent otherwise.
When to Use the GoBuster Tool?
The GoBuster tool can come in handy in various scenarios related to your OSINT investigation. Let's analyze popular instances when the instrument can make your open-source search quicker and easier:
- Use for Penetration Testing. When you check the level of your organization's digital defense, GoBuster can be used to discover hidden paths, directories and files. This helps identify potential entry points for further exploitation and vulnerability assessment. That's how organizations can strengthen their systems and prevent penetration by the culprits.
- Apply for Person of Interest OSINT. In OSINT investigations, GoBuster can be employed to gather information about a target's web presence. By enumerating directories and files, OSINT professionals can uncover valuable evidence for the person of interest's digital portfolio. That's how OSINT experts can easily aggregate personal details, contacts, social media links and media appearance catalog of the individual.
- Exploit for Applications. When testing the security of web applications, GoBuster can help identify forgotten or hidden endpoints that might expose sensitive information. This method aids in assessing the overall security level of the app before the launch or after it has already been made accessible to the public.
- Enumerate Files. Whenever there's a need to systematically enumerate directories and files on a web server, GoBuster can be a valuable tool to automate this tedious process. For example, you can use the tool in such scenarios as forensic investigations or incident response.
GoBuster Installation Guide
If you had experience with Kali Linux tools before, setting up GoBuster will not be much of a hassle. However, if you are only starting to learn the basics of OSINT, consult this guide in order to install the GoBuster tool with ease.
Setting Up a GoBuster Environment
Here's a convenient breakdown of all the basic steps on how to get started with GoBuster so you will not waste time figuring it out by yourself:
- First, in Kali Linux, you can open a terminal by clicking on the terminal icon or by using the shortcut "Ctrl + Alt + T"
- Install GoBuster using the package manager using the command
sudo apt install gobuster - In order to stay up to date and make sure the tool runs smoothly, you can verify that GoBuster is installed correctly by checking its version. Just insert the command
gobuster -vto run the check. - Now that the GoBuster is properly installed, you can start using it for directory and file brute-forcing tasks. The basic command to activate the tool is as follows:
gobuster dir -u <target_url> -w <wordlist_path>. Now, the task is to replace<target_url>with the link to the website you want to scan and<wordlist_path>with the path to the keywords you want to use. Make sure to type in the relevant data in the blank spaces correctly so the instrument works as intended. - GoBuster offers various options and flags to customize your scans according to your requirements. Take time to set up the relevant filters so your OSINT search will go much faster.

How to Use GoBuster?
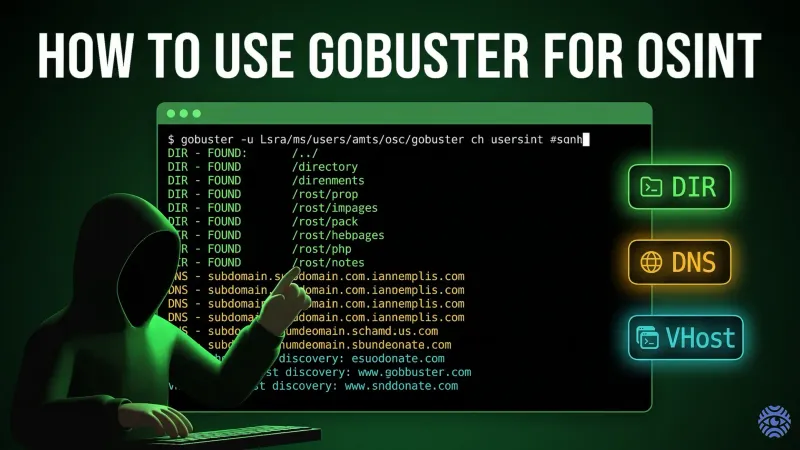
After learning the fundamentals of how to apply GoBuster to enhance the search, it's important to dissect the ways to optimize and automate its operation. That's why you should be familiar with the main flags and modes that will come in handy during the OSINT investigation. Below, we'll cover the usage of GoBuster's DIR, DNS, and VHost as the most prominent commands.
GoBuster DIR Command
The DIR command in GoBuster is used for directory brute-forcing on web servers. Here's how to use it:
gobuster dir -u <target_url> -w <wordlist_path>
However, you need to alter these components:
<target_url>— Replace this with the URL of the target website you want to scan.<wordlist_path>— Specify the path to the wordlist file you want to use for this directory brute-forcing task.
GoBuster DNS Command
The DNS command is used to brute-force DNS subdomains. Employ it as follows:
gobuster dns -d <target_domain> -w <wordlist_path>
Make these changes for your query:
<target_domain>— Type in the names of the target domain you want to enumerate subdomains for.<wordlist_path>— Outline the exact path to the wordlist file containing a list of subdomains to try it out in practice.
GoBuster VHost Command
The VHost command is used to brute-force virtual host names. The utilization is similar to the other queries:
gobuster vhost -u <target_url> -w <wordlist_path>
Then, insert your specific data for these elements:
<target_url>— Note down the name of the target URL you want to brute-force virtual host names for.<wordlist_path>— Insert the path to the wordlist file containing a list of virtual host names to check out.
GoBuster Automation Tips
If you have mastered all the previous steps and the system runs smoothly, make an effort to elevate your GoBuster tool experience further. We recommend trying out these shortcuts and recommendations:
- Automate the entire process by writing a bash script or using a framework like Metasploit to orchestrate the scans and analysis.
- Use the
-tflag to specify the number of concurrent threads. Adjusting the number of threads based on the target system's capabilities can significantly improve the scanning speed without overwhelming your server. - Save the results to a file using the
-oflag. - Employ the
-cflag to specify cookies to be sent with HTTP requests if the target website requires authentication or session management. - Exclude certain HTTP status codes from the scan results using the
-sflag. This can filter out irrelevant responses and focus on potential findings. - Utilize popular wordlists using the command
common.txt. Be aware that it can be a good starting point for directory enumeration, but it may not cover all possible directories specific to your target. - Combine GoBuster with other Kali Linux tools or scripts for more comprehensive scanning and analysis. For example, Nikto can be used to scan the target web server for vulnerabilities, along with the GoBuster tool. After both scans have been completed, you can analyze the results. Combining the reports can provide a more comprehensive understanding of the target's security capacities and weaknesses.
- Consider integrating the results into reporting Kali Linux tools like Dradis or Faraday for better organization and presentation of findings.
- Implement GoBuster scans as part of your continuous OSINT monitoring strategy. Schedule periodic scans to detect changes in the target environment and identify new potential vulnerabilities or misconfiguration.
Combine GoBuster With X-Ray Contact
Even though GoBuster is essential to collect large volumes of data, it cannot be helpful when it comes to making sense of the results. That's why you should verify and analyze the GoBuster findings with the help of the X-Ray Contact aggregator. The combination of these two instruments will allow you to identify the person of interest and potentially learn more about their digital footprint.
X-Ray Contact is compatible with GoBuster as both systems use the same entry channels: Name, Phone, Socials, Email or Image. Even if you managed to allocate only one type of data from the list, it could be enough to do a comprehensive person of interest investigation. If the person has been added to the list gathered by one of our providers, X-Ray Contact will be able to provide you with a Search Profile. It may contain a real name, age, location, contact details, education and job data.
The investigation process is simple:
- Go to the main page of X-Ray Contact and select the Platform tab.
- Select any entry channel and insert the information you managed to gather with GoBuster in the search bar.
- If the person has been present in the data of our providers, you will have a comprehensive overview of what details are available.
- Store the results using one of the Kali Linux tools like Dradis or Faraday to avoid confusion.
Conclusion
No matter your expertise level with OSINT, such a Kali Linux instrument like GoBuster can significantly improve your brute-forcing techniques. Don't be intimidated by the pitfalls and nuances of the GoBuster tool, and use its capacities to massively accelerate your data collection.